Sunday 1 March 2020

How to roast a chicken with a lemon up its bum.


Here is a picture of most of the things you will need:


Again, any cats seen are surplus to requirement.

Heat the oven while you assemble your bird.  You probably need a moderately high heat, so 190 - 200 degrees celsius.

Here's the list:

  • One medium chicken
  • One lemon
  • One bulb of garlic, separated into cloves and peeled
  • Salt
  • Pepper
  • Various vegetables sliced so that they can make a layer for the chicken to sit on.  I used three small carrots, two sticks of celery and a red onion sliced through with slices at about 0.7 cm thickness
  • Rosemary if you have it or a herb of your choice.  I had intended to use thyme
  • Streaky bacon
  • Butter - around 50 g
  • Olive Oil
First, use about a tablespoon of olive oil and use a brush or your fingers to make sure that the inside of the roasting tin is covered.  Then add the vegetables to make a bed to sit your chicken on.  Here's mine:


Add about a tablespoon of salt to the cavity of the chicken (take out any giblets first and save them for something else), turning the chicken around so that the salt is evenly distributed.  Put a few cloves of garlic into the cavity, then the lemon (piercing it through with a sharp knife first) and then the rest of the cloves of garlic, pushing a few around the sides of the lemon.


This would be where you would add herbs to the cavity if you remember.  I forgot. In the end I shook about a tablespoon of thyme and some pirpiri season (birdseye chillies and lemon) over it.

Put the chicken in the roasting pan and, using your hands, lift the skin from the breast side and shove a knob of warm room temperature butter under the skin between the skin and the flesh.  You may have to break a membrane near the bum end.  Massage the butter so that it is spread out over the chicken.  Your chicken will look like this:


Try and get the butter distributed as evenly as possible and smear a little on the thighs. 

Now cover the chicken with streaky bacon.  


If you have one, use a wooden cocktail stick to pin the parson's nose into place and kitchen twine to bind the legs together but if you don't have these things, don't worry. 

Put it in the oven for an hour or so (look up the times for a bird your size) and forget about it.  If you want, you can take it out and baste it, and maybe upend the chicken a bit so that some of the juices come out to baste the vegetables, but you don't need to. 

The best way to tell if a chicken is cooked is to use a meat thermometer and stick it down the thickest part of the drumstick - you want your baby to get to at least 165 /70 deg celsius.  It should be near there after an hour.

If the bacon is now crispy, take it off.  If it isn't crispy, give it an extra ten minutes.  You can eat it wiht a glass of wine as an aperitif. Baste the chicken with the juices in the pan - you may have to tilt it to get the juices coming out. 

Once the bacon is off, turn the temperature up to 220 degrees celsius and put the chicken back for 20 minutes to half an hour, so that the skin is golden.  Mine looked like this when I eventually took it out: 


Get it out of the tray and onto a plate and cover it with foil, letting it reabsorb all the juices, for fifteen minutes - half an hour. 

Meanwhile, make the gravy. Your pan should look like this, with some of the vegetables charred (hopefully).  


Try one of the carrots - it should taste AMAZING.  The juices in the pan are a combination of bacon fat, chicken fat, butter and lemon juice.  You are going to add chicken stock and flour. 

Heating the pan on medium over one or two hobs (if the hobs are close enough or the roasting pan big enough), sprinkle in a heaped teaspoon of ordinary plain flour.  Not cornflour, flour.  Stir and mash this continally until the flour has been bubbling for about a minute.

Add about 300 - 500 ml of chicken stock slowly, and continually stir until the juice-soaked flour is incorporated.  Heat until it bubbles for a minute.  Voila, gravy. 


You can pass the gravy through a sieve and I would, if I had company.  

Sunday 8 January 2017

Satay stir-fried chicken using peanut butter.

My niece told me that she tried to cook satay stir-fried chicken using a sauce from the supermarket, but that it ended up not tasty.  She was a little upset because she loves satay sauce.

"How hard can it be?" I thought.  It turns out, not very.

This was an initial foray so everything is pretty much malleable.  Anyway, first I marinaded the chicken using these ingredients:


Ignore the cat.  There is no cat in this stir-fried chicken.

The list of ingredients is:

  • One chilli pepper, bog standard supermarket. 
  • About a thumb of fresh ginger
  • four(ish) garlic cloves
  • Apple cider vinegar
  • Light soy sauce
  • Sesame oil (what is on display here is a special stir-fry sesame oil containing extra garlic and chili but ordinary sesame oil would suffice)
  • Black pepper
  • Chinese five spice powder. 
I deseeded the pepper and skinned the garlic and peeled the ginger.  I added all of these to a mini-chopper along with a glug of cider vinegar, a glug of light soy sauce, a good shake of five-spice, a pinch of pepper and a glug of oil and whizzed them until they had made a marinade.  It's possible that I used too much soy sauce, and I didn't actually use any salt, figuring that the soy sauce would be salty enough.  

I cut one chicken breast into strips and then tossed the strips in the marinade as shown below.


I covered the bowl with clingfilm and left the strips marinading for a couple of hours.  I would imagine that the minimum time needed for marinading is around 30 minutes.

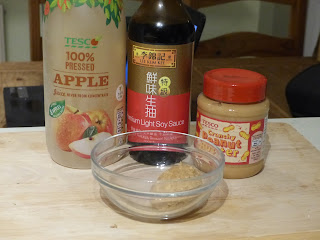
A couple of hours later, I put the wok on to warm up while making the satay sauce.  To make the sauce, I used these ingredients:


  • peanut butter
  • apple juice (not from concentrate)
  • soy sauce
Again, I was pretty much making up the amounts as I went along.  I used about a desert spoon of the peanut butter, about double the volume of apple juice and a glug of soy sauce.  Again, I could probably have cut down on the soy sauce (the finished dish was very salty), perhaps limiting it to one teaspoon.  The apple juice goes really well with peanut butter, having the right sort of sweet -sourness; if you had rice wine or cider of even dry sherry, that would also do.  I probably had too much liquid, so an equal volume of the juice would also have been fine. 

I put all of the ingredients in a small bowl, covered it with clingfilm and microwaved it for around 30 seconds so that I could mash them up into a liquid, as below.  It tastes much better than it looks. 


When the wok was pretty hot, I added about a tablespoon of stir-fry oil and then the chicken strips, reserving the marinade for later.  I fried the chicken strips for a couple of minutes.


Then I added half a packet of stir-fry vegetables (including bean sprouts).


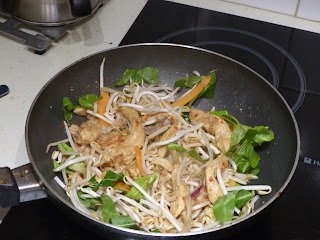
I kept tossing and turning the chicken and the vegetables for about five more minutes.  About a couple of minutes from the end, I added the peanut butter mixture I had prepared earlier, along with the reserved marinade, and kept moving the mixture around until everything was heated through.


It doesn't look great, but it tastes good.  

Next time I make this, I'll cut down on the soy sauce and perhaps the chili - this was very spicy and probably would have worked with half the amount of chili.  If I had to use dry chili flakes, I'd use it in the marinade and use a good couple of shakes of the bottle. 

The core trio of tastes - peanut butter, sour apple juice / vinegar and spicy chili - work very well together.  It's just a matter of finding the right balance.

I think it is probably important to make sure that you do add vinegar somewhere but also to take care not to add too much, so a glug in the marinade is probably about right. 

Monday 31 August 2015

Broad Bean Hummus

Broad beans are the finest food in the world, unless you have that strange and mutant gene which makes you think that they are not the finest food, like my brother in law and his daughter, who really need to be sent to re-education camp anway, for a myriad of reasons, but should be sent there specifically for saying that they don't like broad beans. Because, I mean, who doesn't like broad beans?

OK, fair enough, end-of-season broad beans are a little bit like middle-aged Hell's Angels; a little bit dressed-up in their leathery jackets; a little bit nobbly around the edges but then, even then, all you need to do is double de-pod* them to reveal the still-boyish hearts within. Inside every bearded rocker three days away from his last bath is a little boy who still wants his mum. Remember that; only misfits and social outcasts don't like broad beans and only someone without a heart would reject a little boy who wants his mum.

Enough.  For this hummus, you will need:


  • 1 kg of broad beans
  • tahini
  • smoked garlic, if you can find it; ordinary garlic if you can't
  • a lemon
  • cumin powder. I actually make my cumin powder fresh from seed each time I use it, but cumin powder that hasn't been at the back of the store cupboard for over a year should be fine.
  • olive oil
  • salt - crystals of sea salt if you have them, ordinary salt if you haven't
  • pepper - I actually think that black pepper in a grinder is necessary.  Pre-powdered pepper is not great.
First, de-pod the broad beans.  Here is what 1 kg of late-summer broad beans look like de-podded:


Here, you will see that I have covered them in cling film.  This is because to cook them I have splashed about two tablespoons of water in there (or two quick passes under the cold-water tap) and am about to put a couple of holes in the cling film to let steam escape.

So, put two splashes of water into your broadbean bowl, cover with cling film, pierce in a couple of places and microwave on 800W for about four minutes. Adjust the timing according to the amount of hummus you are making - if I was doing half this amount, I would probably do 3 minutes. I could probably have done a minute more because these are late-summer broad beans and a little tough.

Then, after four minutes, put the bowl in a colander and run some cold water over the beans until the beans and the bowl you microwaved them in are room temperature.  Be careful removing the cling film, because you have effectively steamed the beans, and that steam is still hanging around.  You'll see that some of the jackets have split to show the bright green insides.

To double de-pod the beans you are going to need three bowls (I didn't take a picture of this bit because I needed two hands to do it and another to hold the camera and the cats were refusing to co-operate).

Put the bowls in a row with the bowl full of microwaved beans on one end. Pick up a bean, and if the jacket isn't split, make a nick in it with a small knife. Squeeze the bean so that the insides squirt out into one bowl, and discard the jacket into the other bowl. Repeat for all of the beans. See footnote.** This takes less long than you would think while actually not taking long enough, on another level. 

Here's a picture of all of the things I am going to add to the double de-podded broad beans, not including the salt and pepper:

Did you know that you should store your tahini upside down in the fridge?  Obviously, it's the right way up, here, but the seedy / corn-floury part of it slowly sinks to the bottom and you need that as much as you do the oil; if you store the jar upside own, when you take it out and put it the right way up, all the tahini mixes up ready for you to use it. HANDY HINT NUMBER 113.

I've got a lemon and a lime there, because the lemon was quite small and the broad beans quite old and I wasn't sure that I would have enough liquid. The end result was too citrusy, this time, so I could have done with one lemon or perhaps even less - maybe nine tenths of a lemon.

Now, I used a stick blender for this next bit, but you could also do it in a food processor. I was simply trying to save on washing-up. 

In the bowl with the double de-podded broad beans, put four or five chopped cloves of smoked garlic - or more if you want.  If you are using real garlic, it's stronger so use a little less. Add the juice of a lemon (I warmed the whole lemon in the microwave on 800W for 20s first, to get more of the juice out), a tablespoon or two of tahini (I used two tablespoons, but I think that is too much because then you can't taste the broad beans; one is probably better), and two tablespoons of oil (use more oil if needed), a good pinch of salt and a crunch of pepper.

Also add cumin. If you are making the cumin powder fresh, toast about two tablespoons of the seed in a very hot pan for about five minutes, stirring and shaking continually until the seeds darken in colour and start 'steaming' and giving off a strong cumin / menthol smell. Then, grind them up in a coffee bean grinder you have bought just for this purpose. A tablespoon of seed turns into about a two teaspoons of powder and you'll need roughly a rounded teaspoon of cumin powder.


Here is a picture of two tablespoons of cumin seed roasting in a pan. They are about halfway through the roasting:


My bowl looked like this: 


Now blend until you get a smooth, green paste. Your final hummus should look a little bit like this:


If you have done this right (and not overdone the tahini or lemon, like I did this time), you should get a lovely garlic and cumin flavoured dip which goes brilliantly with things like spring onions and celery.   Or, more realistically, crisps. 

** Not this footnote.  That* footnote.

* It's very therapeutic, double de-podding broad beans. It's better than squeezing blackheads, certainly, although  very similar in some vital aspects.

Wednesday 21 May 2014

More single portions

So, here are some more single portions of fruit and veg; disclaimer as normal.

The one pound coin you see in some pictures is there to give an idea of scale.


This is two portions, probably, after cleaning.  So, one stuffed pepper half is one portion even before you add in the onion and the mushrooms, which you would if you, say, chopped up some streaky bacon and fried it slowly so that all the fat came out and then used that fat to fry a small onion and some finely chopped mushrooms (and garlic) and then added some couscous that had been simmered in boiling stock as per the instructions on the packet and some blue cheese and perhaps some walnuts or goats cheese and finely chopped sun dried tomatoes and then mixed it all up and packed the mixture into the cleaned half-shells of pepper which had previous been painted with olive oil and roasted at 200 C for twenty minutes, and then put them back into the oven for another twenty minutes to half an hour although these times are, as always, pretty fictional.


One red, on-the-vine five seconds previously rather large roast red tomato.  I said roast rather than red, because I was thinking of roasting this and its three friends (six portions altogether I believe) with about a head of garlic, broken into individual cloves but not peeled,  for about 40 minutes at a lower heat - say 160 or 140 (your oven temperatures will vary).  I'll toss the quartered tomatoes and the garlic cloves in about a tablespoon of olive oil and a tablespoon of balsamic vinegar, some sea salt and coarsely ground pepper before putting them in the roasting tin and drizzling any juices left in the mixing bowl over them.

And then, when the tomato skins are beginning to char and some of the juices caramelise, I'll put everything in a bowl and let it cool before squeezing the roast garlic out of the skins and in with the roasted charred tomatoes.  And then I'll fry an onion, a finely chopped stick of celery and a carrot in some oil in a large saucepan until the onion is caramelising, add 500 mL of chicken stock and the tomato and garlic mixture and let it simmer for half an hour; then I'll puree everything and eat it with a bread roll.  And there you have at least four helpings of vegetables by the strict count and more like nine by the vegetable-matter count. This is the best soup in the world, by the way, and strangely, resembles Heinz tomato soup more closely than I care to analyse.  You can add some thyme as well.


Going to eat these with CREAM.  Going to eat these now!  Only I'm going to eat TWO helpings.

The coin adds 10g so that's one helping there.  It's basically half a punnet.


98 g.  It's a carrot.   It's a medium sized carrot. You'll basically lose about 10 g cleaning it and topping and tailing it. You basically need, probably, around 5 - 6 of these to make the carrot and garlic soup with cashew nuts, chilli and lime.  I'm just saying.


A head of chicory.  You know what?  I have no fucking idea what to do with this.  I'm told they're bitter.  I've just got my veg box.  Can you tell?


A head of spring greens, which is a proper cabbage and not one of your prissy, dandified court versions such as savoy or, you know, red.  This is a proper working class cabbage, full of lust, iron and maggots.

It's a bit manky on the outside, so when I took those four leaves off, I was left with around 120 g.  I'll take a sharp knife and excise the white ribs from these remaing leaves, piling the deskeletonised corpses  onto each other until the supplicants remaining on the stem are unformed and whimsical; I'll shred the piles of leaves into 1 - 2 mm strips with that same sharp knife and plunge the shards into boiling water for two minutes, decant, and drain in a colander.  Then I''ll warm a tablespoon of olive oil and a couple of minced or finely chopped cloves of garlic (and perhaps a chilli) over a very low heat in the same saucepan for five minutes, turn the heat up slightly and toss the drained blanched leaves in the garlicky oil.  Proper food. Proper bloody food

Sunday 18 May 2014

How much is one portion of fruit and veg?

It's been a long time.  Sorry.

In the news recently: the idea that eating more fruit and vegetables may cut stroke risk.  Well, duh.

On the back of that came an increase in the recommended number of servings of fruit and veg a day - from five to seven (1) (2).  Panic all over my friends lists and around me: "We find it hard enough with five!" etc., etc.

Which got me to wondering how much exactly is one serving of fruit and veg?

The answer is 80g.  The recommendation of five originally was so that people would ingest the 400 g of soluble-fibre-containing* fruit and vegetable matter.

So, in the interests of SCIENCE, I decided to take some photographs of what 80g of various fruits and veg looked like.  None of these pictures actually shows 80g as sometimes it's hard to find one-of-something small enough to fit the 80g criteria. Still, it's interesting.


You get four portions of strawberries in a punnet.


This will be slightly less once the woody ends are cut off, but I'd say that you get around two portions of asparagus in a bunch.


Need to eat these.  This is about a quarter of a punnet of mushrooms.


This weighs 112 g - it's a very small leek and will probably be about one portion when the ends are trimmed.  A big leek might be three - four portions.


Also need to eat this - but it's a smallish courgette.


This is a fairly large orange, and in the end, I juiced it and used the juice to macerate the strawberries (the whole punnet) with some unrefined cane sugar, ginger and pepper (If I'd had some amaretto or gin, I'd have added that as well).   Juice doesn't really count (see footnote).  If I were eating this, though, I reckon it would be about three portions.

More of these as I remember.  The killer, it seems, is having to have five *different* fruit and veg a day.

**This is why fruit juice doesn't count and is actually worse for you than Satan's STDs.


Saturday 12 January 2013

Korean-style beef and cabbage stir-fry

This uses a basic stir fry method, but includes shredded cabbage rather than noodles or bean sprouts.  It also includes leeks (which are absolutely brilliant in combination with many of the far-eastern flavour sets, especially when the recipe includes chilli).  It's incredibly tasty and relatively low fat.  Most of the ingredients are things you'll probably have anyway, but one ingredient - Szechuan Pepper - is a bit more unusual, and well worth finding.  Try the usual Asian cookery stores, and they'll sometimes have it in in a particularly cosmopolitan Tesco. You can leave the Szechuan pepper out, too, but the dish will lack a particular dimension. Rice wine may also be hard to come by; but you can substitute dry sherry for that, if you really can't find it.

Ingredients (for two servings)

The basic food ingredients are shown on the right.  These are:

  • one leek
  • one sirloin steak or similar.  I started making this with the steaks I found in the dead-food section at Tesco, and it's an excellent use of not very nice-to-look-at steak.
  • one chilli - this should actually be 'some chilli'.  It all depends on how hot you want it.  The chilli has a fruity hotness, which is nice, but you'll have other ingredients to add heat as well.  I took all the seeds out of this chilli to reduce the heat from it.  You could also use three quarters of a teaspoon of chilli flakes, but be careful, because a jar of chilli flakes usually includes the hotter seeds.
  • one bunch of spring onions - actually, the amount shown here is a rather large bunch. You could manage with smaller
  • A few garlic cloves, but go for more than you'd think, rather than less.
  • Fresh ginger - the amount shown is rather a large amount, being more than a 'thumbs worth' - you could go with less; about a thumb's worth is good.
  • Corn oil.
As well, for a marinade, you'll need:
  • Light soy sauce
  • Chinese five spice powder
  • Chinese rice wine or chinese cooking wine.  As stated above, you can substitute dry sherry, and (although I haven't done it) I reckon that a strong, cloudy cider might well do a good job here.
  • Szechuan pepper
  • cornflour
  • 200 ml of a good, strong beef stock.  I dissolve one beef Oxo cube into 200 ml of hot water, and that's fine.  
  • Pepper and salt
Preparation

You need to prep the beef and then let it marinade for at least half an hour.  I haven't tried marinading this overnight, but I expect that you could do that, if you wanted, in a fridge.

First, trim all the fat and sinews from the beef, and then cut it into very thin strips, about 1 - 2 mm thick, across the grain.

The first picture here shows the process of cutting the beef into thin strips.


This second picture shows how many strips of beef you can expect from one sirloin.


Put the beef into a bowl and add the ginger, grated (make sure you add all the ginger juice that comes out in the grating, as well), the finely chopped chilli, the garlic, grated, and a good shake (about a rounded teaspoon) of five-spice power.  You could add pepper and salt at this stage if you want, but be careful with the salt as the soy sauce and stock are potentially very salty.

Into a separate bowl, measure out two tablespoons of light soy sauce and one tablespoon of rice wine.  You also need to measure out one teaspoon of cornflour.


Measure out a few of the Szechuan peppers - about half a teaspoon - and put them into the pounded bit of a mortar and pestle.  The Szechuan pepper adds a numbing heat which is quite different to the heat from the chilli.  Grind them down roughly with the pounding bit of the mortar and pestle, and add those to the beef, ginger, garlic and chilli mixture. 
Add the liquid  to the beef-garlic-chilli-ginger bowl and mix well, so that every strip of beef is coated with the spices and ginger and garlic mix, then add the cornflour and mix some more so that that is well-distributed, as well.  The cornflour is there to thicken the sauce at the end of cooking; you don't have to put it in at this stage. You could add the cornflour to the mixture just before you fry the beef, but this way it seems to soak up all the juices in the marinade while the beef is marinading, and that's good.  I think.
 
Cover the bowl with clingfilm and set it aside while you prep the vegetables.
 
Chop the cabbage into fine shreds, about a centimeter in width. (I have also made this recipe using the tough outer leaves of a cabbage instead of the sweeter, inner part - and the irony, bitter taste of those outside leaves was very very acceptable).  I used about half - two thirds of the cabbage shown at the top.

Chop the leeks and the spring onions.


Place a wok over medium-high heat and add a splash of flavourless cooking oil (corn, or peanut).  When the oil is hot, add the beef strips.  You'll find that the cornflour and chilli-garlic-ginger mix has soaked up most of the liquid.  Don't throw any left-over liquid away.  Keep stirring and turning until all of the beef strips are browned.


Then, add the prepped vegetables with the vegetables that take the longest to cook being added first.  In this case, the order will be leeks, then cabbage, leaving the spring onions until the end (spring onions needing hardly any cooking at all).  Keep stirring and turning - the leeks will need a good five minutes more than the cabbage.  As the cabbage starts to wilt, add any juices left in the bowl as well as the 200 ml of beef stock to the pan.  Keep stirring and turning over the heat, as the beef stock thickens with the cornflour and the juices from the marinade.  This will take a couple of minutes. 
About a minute before the end, add the spring onions.

I like to put the rice on so that it starts simmering just before starting the wok part of this recipe, so that the rice and the stir-fry are finished at about the same time.  You could probably also serve this with noodles.  This is more than enough for two and could serve two and a half, at a pinch.  For seasoning, use dark soy sauce.

I've also cooked this recipe and added toasted almonds at the end, and although they were nice, they weren't really necessary.  For me, the surprise in this recipe is the cabbage - it goes perfectly with the other flavours and makes a really good base to carry the beef, chilli, garlic and ginger. If I was going to make this recipe for a vegetarian I think I'd marinate tofu in the mixture above, then fry the marinade without the tofu, adding the vegetables as above and then adding the tofu to heat through at the end (I'd also use vegetable stock).

Friday 21 December 2012

Roast carrot and garlic soup with cashew nuts, chilli and lime

That's a terribly complicated title for a very simple recipe. It tastes like the BEST THING IN THE WORLD.

What you need for this to serve three to four people

Ingredients:
  • some carrots - about 500 g or 1 lb would be good (see note below).  I think organic carrots taste far better, but YMMV.
  • Some garlic - say, one clove for each carrot or about eight cloves for 500 g.
  • One chilli or chillies of an appropriate strength, fresh or dried.  You can use powdered or flaked chilli if you wish
  • One lime
  • About 150 - 250 g of cashew nuts, not roasted
  • 800 mL of good chicken stock; you can probably substitute vegetable stock if you want this to be vegan.
  • Olive Oil
  • salt and pepper.

When I was cooking this so that I could take pictures, I found fewer carrots in the fridge than I remembered having, and this number of carrots (shown in the picture) made around two healthy servings.  I think that this is around 250 g of carrots, but for three to four servings, use about twice as many as are shown in this picture:

(My phone lens has steamed up taking pictures of food, so these pictures aren't great, sorry).


Method
 
Preheat an oven to around 200 °C.  A fan oven could be slighty lower, and I believe that the gas oven equivalent to 200 °C is around Gas Mark 6. 
 
Peel your carrots and chop them into chunks. 

Pull a garlic bulb into enough separate cloves, and take the flakey, tissue-y skin off the bulbs by rubbing, leaving the tougher peel in place. 

The picture shows how much garlic I used for the four carrots above, de-tissued, but still in its skin:
 
I always use more than one clove per carrot because we're going to roast these unpeeled garlic cloves so that the inside is soft and creamy, with each clove being essentially a little sachet of roast garlic puree and absolutely delicious.  I know that I'll eat half of them before they get to the soup. 

 
Put the carrot chunks in a bowl with the unpeeled garlic cloves, add a glug of olive oil, salt and black pepper, and toss the carrot chunks and unpeeled garlic cloves into a roasting tin.  You do want the unpeeled cloves oiled.  It sounds like madness, but it makes a difference.
 
Roast the carrots for around 40- 45 minutes. 

The carrots need to be soft enough to be mashable, and are even better if beginning to char ever so slightly on the outside;  the garlic cloves need to be squashy when you press them, but not burnt. 

In my experience, the carrot can take about five to ten minutes longer than the garlic to get to the right state, so for absolute perfection, you could add the garlic cloves to the roasting tin about five to ten minutes after the carrots have been put into the oven and leave the carrots in for 45 minutes in total.  If you need to do something else and not fuss about the timing, it's absolutely fine to roast both for the slightly shorter period of time.

If you're using a fresh chilli, I'd add strips in around the same time that you add the garlic (I haven't tried this with fresh chilli yet, but you don't want it burnt to a crisp; I'd imagine that charred would be fine).


While the carrots are in the oven, make cashew nut butter.


Put your cashew nuts onto a small baking dish and stick them into the oven with the carrots for around ten to fifteen minutes.  You need to be careful not to burn them.  They should go in looking rather anemic and come out looking golden-brown.

The picture shows the cashew nuts after roasting.


Making cashew-nut butter is very simple, and totally bizarre.  You will put the cashews in a blender of some sort - I used an ordinary Kenwood Chef Mini - and grind and blend them until they turn into something like peanut butter.  The blending process seems to beat up the nuts until oil starts coming out of them.


The pictures to the right show the stages that the cashew nut crumbs go through as you blend.

 
At first the cashews make very a very fine breadcrumb texture


.After about three minutes, the fine breadcrumb texture begins to clag-up a little bit, looking like small bits of rubber, making bigger crumbs and sticking to the sides.  Keep blending and pushing the mixture down onto the blades.


After about seven to ten minutes, the mixture has the consistency of very dry plasticine and falls apart very easily when you try to shape it.  At this stage you need to add a very little olive oil - around a teaspoon, and blend to mix it in.  The oil instantly transforms the mixture; the more oil you add, the slacker the result.  I want to make quenelles out of these, so I'm careful to add the oil a drop at a time.
 
 
This picture shows the cashew-nut mixture after the oil has been added.  The mixture is not paler in reality but, interestingly, the shinyness of the mixture with added oil meant that more of the flash was reflected back to the camera and the whole picture became much paler as a result. I've reduced the brightness as much as I can so that you can see the texture. 

The mixture is pretty much like a smooth peanut butter, and firm enough to hold its shape when you quenelle it.
 
The carrots will probably have finished roasting by now, as well.  
 
 
Put all of the carrot chunks into a saucepan, and add the roasted garlic and the dry chilli, if you are using that. 
 
This bit is messy. Using a very sharp knife, chop off the end of one of your squashy roasted garlic cloves.  Squeeze the the soft puree inside the peel out onto the carrots in the saucepan.  Lick your fingers and repeat with the rest of the cloves.
 
When you've got as much roasted garlic into the pan as possible, use a stick blender to blend the garlic, carrot and chilli together.  Add the chicken or vegetable stock as you proceed, until you've got the consistency you want.  
 
With the amount of carrots shown in the picture at the top, I used about 400 ml of stock to get a thick soup that I could pour.
 
Reheat the soup in the saucepan, taste and add salt and pepper as necessary.
 
Place a quenelle (or spoonful, if you're in a hurry) of the cashew-nut butter into the centre of your soup dish.  Pour the hot carrot soup over the cashew nut butter and squeeze a quarter or a half of a lime onto the top of that. 
 
Don't stir the lime in - part of the joy of this soup is that not every mouthful contains the acidic lime; the lime is used as a condiment rather than an ingredient.  
 
Eat the soup with a small portion of the cashew nut butter in every spoonful - fantastic!  I like to eat it with rice cakes.